
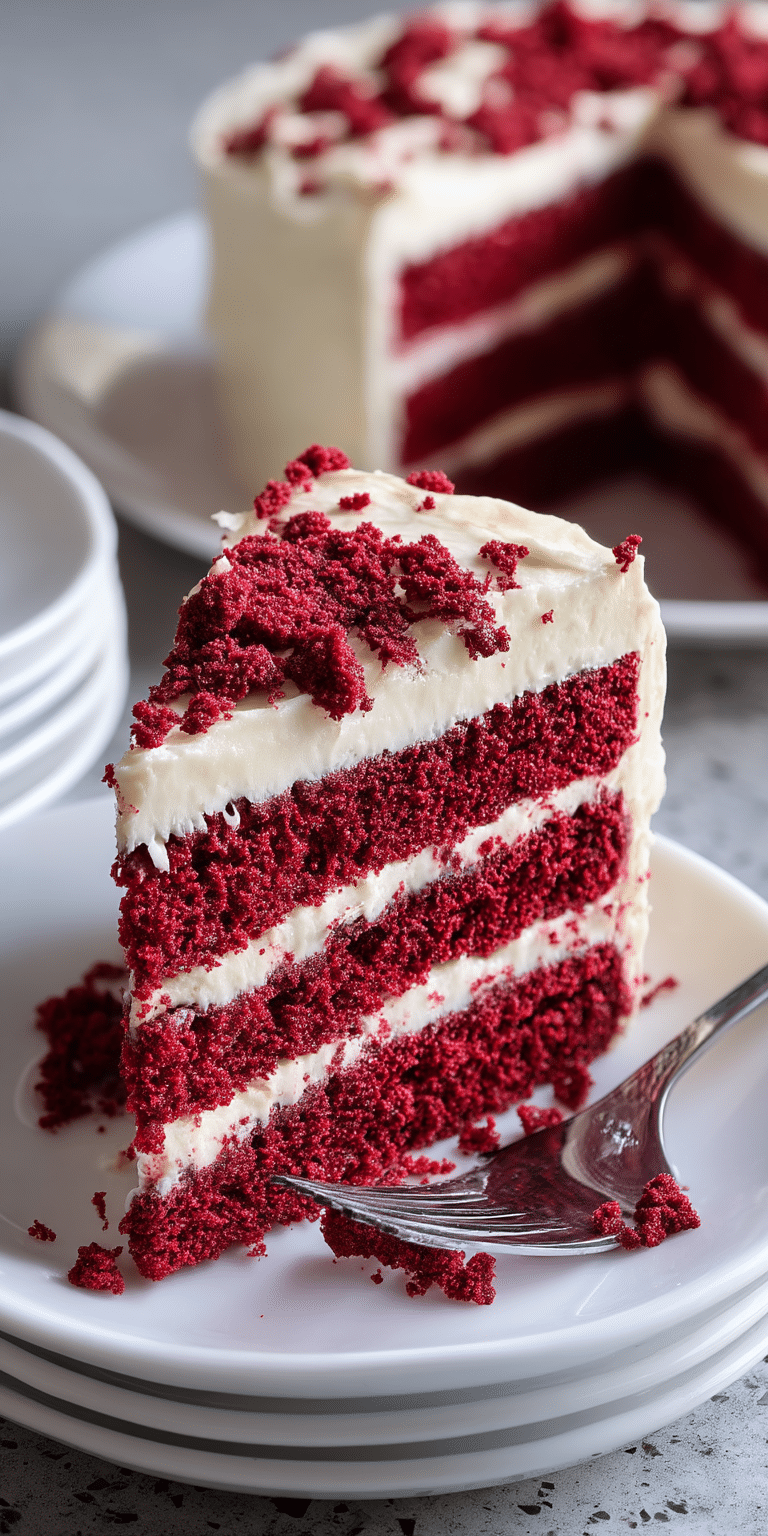
I still remember tasting my first slice of red velvet cake, its crimson crumb contrasted by a snowy layer of cream‑cheese frosting.
That moment showed me that baking could feel both luxurious and deeply comforting.
Over the years, I chased that perfect balance of tenderness, cocoa depth, and slight tang until I developed the recipe that follows.
Now I’m inviting you into my kitchen so you can recreate the same bakery‑quality magic without leaving home.
Nostalgic Appeal
Red velvet carries more than color; it evokes Southern gatherings, holiday tables, and whispered family secrets.
When I bake it, relatives trade stories about ancestors who tinted batter with beet juice long before bottled dye.
Those conversations remind me that recipes act as edible diaries, preserving memories one slice at a time.
Each crumb feels sweeter because it connects me to past generations while letting me add my imprint to tradition.
Homemade Focus
Boxed mixes offer speed, yet they never deliver the plush, tight crumb that fresh ingredients guarantee.
By letting dairy warm to room temperature and whisking liquids by hand, I control gluten development for velvety softness.
I line pans with parchment circles so layers release perfectly, avoiding the heartbreak of torn edges.
From real vanilla to properly sifted cocoa, every deliberate choice deepens flavor in ways shortcuts can’t match.
Flavor Goal
I aim for subtle cocoa that hints at chocolate without overwhelming the palate.
Buttermilk brings gentle acidity, lifting sweetness and sharpening color.
A touch of vinegar reacts with baking soda, creating airy lift while preserving the cake’s signature tang.
Finished with cloud‑like cream‑cheese frosting, each bite marries richness, brightness, and melt‑in‑the‑mouth softness.
Ingredient Insights
All‑purpose flour supplies strength yet stays neutral enough to remain tender.
Granulated sugar sweetens while locking in moisture, ensuring slices stay soft for days.
Dutch‑process cocoa lends mellow chocolate notes and deepens the scarlet hue.
Neutral vegetable oil disperses evenly, keeping the crumb plush long after baking.
Buttermilk’s lactic acid reacts with leaveners, intensifying both rise and flavor depth.
Large eggs emulsify fats and liquids, yielding a glossy, unified batter.
Quality red food coloring produces vibrant shade without metallic aftertaste.
White vinegar sharpens brightness, making that crimson crumb truly pop.
Pure vanilla extract rounds everything out with warm, floral notes.
Brick‑style cream cheese forms a sturdy frosting base that whips to silky peaks.
Unsalted butter provides richness while letting you decide exactly how much salt the dessert needs.
Sifted confectioners’ sugar dissolves instantly, giving the frosting its characteristic billowy texture.
Essential Equipment
Three sturdy nine‑inch aluminum pans conduct heat evenly for level layers.
A stand mixer with paddle and whisk attachments speeds both batter mixing and frosting aeration.
A fine‑mesh sieve breaks up cocoa lumps, preventing streaks in the crumb.
An offset spatula spreads frosting thinly between layers, while a bench scraper smooths outer walls.
Parchment rounds safeguard against sticking, ensuring perfect release.
A digital scale delivers consistent measurements, crucial for flour that compacts easily.
A long serrated knife levels domes without compressing the delicate crumb.
A revolving cake stand allows steady, fluid motions, creating a professional finish at home.
List of Ingredients with Measurements
Cake Layers
2 ½ cups all‑purpose flour
1 ½ cups granulated sugar
1 teaspoon baking soda
1 teaspoon fine salt
2 tablespoons Dutch‑process cocoa powder
1 cup vegetable oil
1 cup buttermilk, at room temperature
2 large eggs, at room temperature
2 tablespoons red food coloring
1 teaspoon distilled white vinegar
1 teaspoon pure vanilla extract
Whipped Cream‑Cheese Frosting
1 pound brick‑style cream cheese, softened
1 cup unsalted butter, softened
1 teaspoon pure vanilla extract
4 cups confectioners’ sugar, sifted
Always allow refrigerated items to reach room temperature so the batter blends smoothly and the frosting whips without lumps.
Cold dairy can seize mixtures and create grainy textures, so patience here pays dividends.
Gather and organize every component before starting, and the baking process flows effortlessly.
With mise en place complete, you’ll move confidently through each step without scrambling for tools or ingredients.
Step‑by‑Step Instructions
Step 1: Prep the Pans and Oven
Preheat the oven to 350 °F, positioning the rack in the center for even heat.
Grease three nine‑inch pans with non‑stick spray and line each base with parchment.
Set the prepared pans nearby for quick filling once the batter is ready.
Proper prep prevents sticking and encourages uniform rise.
Step 2: Combine Dry Ingredients
In a large bowl, whisk flour, sugar, baking soda, salt, and cocoa until the mixture looks uniformly chocolaty.
This quick aeration removes hidden lumps that can create tough pockets.
Even color signals even distribution of cocoa, a key for balanced flavor.
Setting aside the dry mix now streamlines assembly later.
Step 3: Blend Wet Ingredients
In a second bowl, whisk oil, buttermilk, eggs, red coloring, vinegar, and vanilla until silky.
Room‑temperature liquids emulsify quickly, avoiding streaks of oil or dye.
Whisk until the tint appears evenly crimson with no darker ribbons.
A unified mixture prevents over‑mixing once dry ingredients join.
Step 4: Make the Batter
Pour wet ingredients over dry in the stand‑mixer bowl and attach the paddle.
Beat on low until no white streaks remain, stopping once to scrape down sides and bottom.
Cease mixing as soon as the batter turns velvety to maintain tenderness.
Over‑mixing develops gluten, which can toughen the crumb.
Step 5: Portion the Batter
Divide the batter evenly among the prepared pans; a kitchen scale guarantees identical layer height.
Tap each pan on the counter to release trapped air bubbles.
Even distribution helps layers bake at the same rate, avoiding burnt edges.
Minimal air pockets mean a finer, more luxurious crumb.
Step 6: Bake the Layers
Slide the pans onto the rack and bake for 18–20 minutes, rotating halfway through.
A toothpick should emerge with a few moist crumbs, never wet batter.
Watch closely at the 17‑minute mark, as over‑baking dries the cake.
Even heat and rotation ensure level tops without doming.
Step 7: Cool Completely
Remove pans to wire racks and rest ten minutes to set structure.
Invert layers, peel away parchment, and let them cool fully on the racks.
Frosting too soon can melt and slide, so patience is critical.
Cool cakes also slice more cleanly when serving later.
Step 8: Whip the Frosting
In the mixer fitted with the whisk, beat cream cheese and butter on medium until creamy.
Splash in vanilla, then gradually add confectioners’ sugar, whipping until light and billowy.
If your kitchen is warm, chill the bowl five minutes to firm the mixture.
The goal is a spreadable frosting that holds soft peaks without drooping.
Step 9: Assemble the Cake
Place the first layer on a serving board and spread about one cup of frosting edge to edge.
Repeat with the second layer, then top with the final layer.
Apply a thin crumb coat over the entire cake to lock stray crumbs in place.
Chill fifteen minutes so the surface firms before final smoothing.
Step 10: Finish and Set
Spread the remaining frosting in a thick, even layer over sides and top.
Smooth using an offset spatula while rotating the cake stand for professional results.
Garnish with cake crumbs, toasted pecans, or shaved chocolate if desired.
Refrigerate thirty minutes to set before slicing with a hot, dry knife.

Troubleshooting
Dry texture often stems from over‑baking; reduce time by two minutes and verify oven accuracy with a thermometer.
Sunken centers indicate over‑mixed batter or under‑baking; mix gently and test sooner next round.
Runny frosting usually means butter was too warm; chill the bowl briefly, then re‑whip until thick.
If color bleeds onto plates, switch to a concentrated gel dye that bonds better with the batter.
Tips and Variations
Swap half the oil for melted butter if you crave richer flavor while retaining moisture.
To color naturally, strain roasted beet purée, then adjust cocoa downward for balance.
Fold mini chocolate chips into the batter for fudgy surprises without altering structure.
Press toasted coconut flakes onto sides for crunch and an eye‑catching finish.
Serving and Pairing Suggestions
I love chilled slices with strong black coffee, whose bitterness tempers sweetness.
A scoop of vanilla bean ice cream turns each portion into a dessert‑shop experience.
During winter gatherings, a drizzle of raspberry coulis adds tang and mirrors the crimson crumb.
For celebrations, a lightly sweet sparkling rosé refreshes the palate between bites.
Nutritional Information
A twelfth of the frosted cake averages 640 calories, perfect for an indulgent treat.
Expect about 35 grams fat, 82 grams carbohydrates, and 5 grams protein per slice.
Sodium hovers near 340 milligrams, mostly from leaveners and buttermilk.
Sugar reaches roughly 61 grams; reducing frosting or using powdered erythritol can lower that figure.
Best Moist Red Velvet Cake Recipe with Fluffy Cream Cheese Frosting | Easy Bakery‑Style Dessert You Can Make at Home

This moist red velvet cake is rich, fluffy, and vibrant, perfectly paired with a whipped cream cheese frosting that’s light, tangy, and irresistibly creamy. A classic and elegant dessert for any celebration.
- Author: Katie
- Prep Time: 20 minutes
- Cook Time: 20 minutes
- Total Time: 40 minutes
- Yield: 12 servings
- Category: Dessert
- Method: Baking
- Cuisine: American
- Diet: Vegetarian
Ingredients
- 2 1/2 cups all-purpose flour
- 1 1/2 cups sugar
- 1 teaspoon baking soda
- 1 teaspoon fine salt
- 2 tablespoons dutch pressed cocoa powder
- 1 cup vegetable oil
- 1 cup buttermilk
- 2 large eggs
- 2 tablespoons red food coloring
- 1 teaspoon white distilled vinegar
- 1 teaspoon pure vanilla extract
- 1 pound cream cheese, softened
- 2 sticks (1 cup) unsalted butter, softened
- 1 teaspoon pure vanilla extract (for frosting)
- 4 cups sifted confectioners’ sugar
Instructions
- Preheat oven to 350°F (175°C). Spray three 9-inch cake pans with baking spray and set aside.
- Sift together flour, sugar, baking soda, salt, and cocoa powder in a large bowl.
- In another large bowl, whisk together vegetable oil, buttermilk, eggs, red food coloring, vinegar, and vanilla extract.
- Combine the wet and dry mixtures in a stand mixer. Mix until just blended. Scrape down the sides of the bowl to fully incorporate all ingredients.
- Evenly distribute the batter among the prepared pans.
- Bake for 18 to 20 minutes, checking for doneness with a toothpick at the 16-minute mark. Rotate the pans halfway through baking.
- Once baked, remove cakes from the oven and allow them to cool completely before frosting.
- To make the frosting, beat butter, cream cheese, sugar, and vanilla in a stand mixer for about 5 minutes on medium speed until light and fluffy. Scrape down the sides as needed.
- Frost the cooled cake layers as desired and serve.
Notes
- Ensure all ingredients are at room temperature for the best texture and mixing results.
- Do not overmix the batter to keep the cake light and tender.
- Use gel food coloring for a more vibrant red tone if preferred.
- Store the frosted cake in the refrigerator for up to 5 days.
- Let the cake sit at room temperature before serving for best flavor and texture.
Recipe Summary and Q&A
This bakery‑quality red velvet cake features a moist cocoa‑buttermilk crumb capped with fluffy cream‑cheese frosting.
Room‑temperature ingredients, gentle mixing, and quick baking ensure consistent rise and velvet softness.
Master these steps once, and you’ll have a show‑stopping dessert ready for any celebration.
Below are answers to questions readers often ask after their first bake.
Q: Can I bake the batter in two pans?
Yes, but extend the bake to 25–28 minutes and test early for doneness.
Q: How long will the frosted cake keep?
Stored airtight in the refrigerator, it remains moist and flavorful for four days.
Q: Can I freeze layers in advance?
Absolutely; wrap cooled cakes tightly in plastic and foil, then freeze up to two months.
Q: Is gel dye interchangeable with liquid?
Use half as much gel because it is more concentrated and yields deeper color.
Q: May I reduce the frosting?
Decrease each frosting ingredient by one‑third for a thinner coat without risking shortages.
Bake this red velvet once, and every slice will transport you back to that unforgettable first taste of crimson cake and silky frosting.
I hope it becomes a treasured addition to your own culinary story, just as it has to mine.
Happy baking, and please share any creative twists you discover along the way.