Okay, let’s talk about Black Forest icebox cake for a minute because this dessert is about to become your new summer obsession. Picture this: all the rich, chocolatey, cherry-filled goodness of that fancy German Black Forest cake, but you literally don’t have to turn on your oven. I’m talking zero baking, zero stress, and maximum “wow, you’re amazing at this whole dessert thing” reactions from everyone who tries it!
Why This Black Forest Icebox Cake is Pure Summer Genius
Here’s what makes this incredible Black Forest icebox cake so ridiculously perfect – it’s got all those classic flavors you love (rich chocolate, sweet cherries, and creamy goodness) but in a format that’s actually doable for real people with real lives. No complicated cake layers, no worrying about things falling apart, just simple assembly and overnight chilling that does all the work for you.
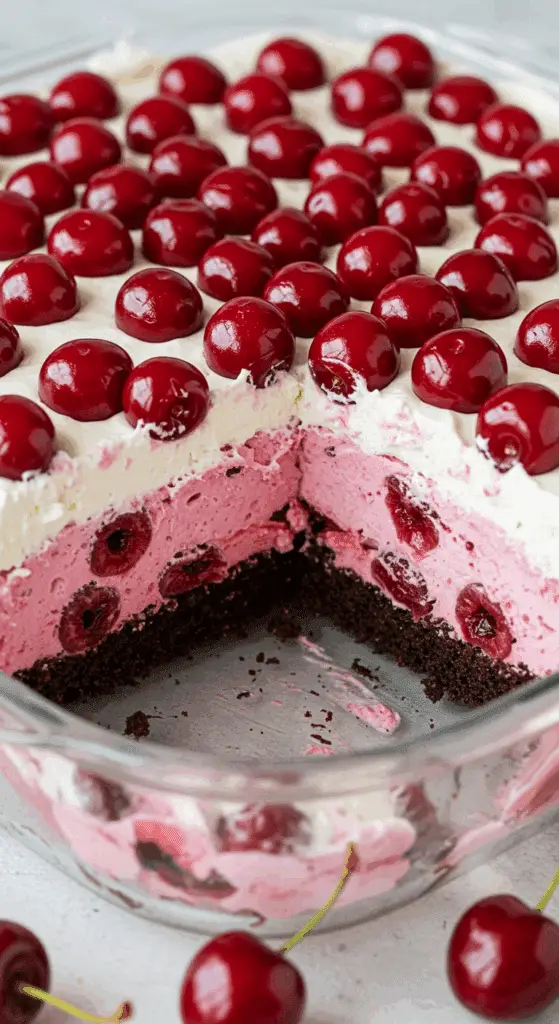
The magic of this amazing Black Forest icebox cake? Those chocolate cookies soften up overnight and become cake-like layers, while the cream cheese filling gets all tangy and perfect, and those cherries just make everything taste like summer happiness. Plus, it actually gets better as it sits – how’s that for convenience?
The breakdown: 6 hours 20 minutes total (but only 20 minutes of actual work!). Serves 12 people generously. Super beginner-friendly – if you can dip cookies in milk and spread filling, you’re golden.
What makes this fantastic Black Forest icebox cake better than trying to make the traditional version? No oven, no stress, no chance of things going wrong, and it tastes just as amazing!
Table of Contents
Table of Contents
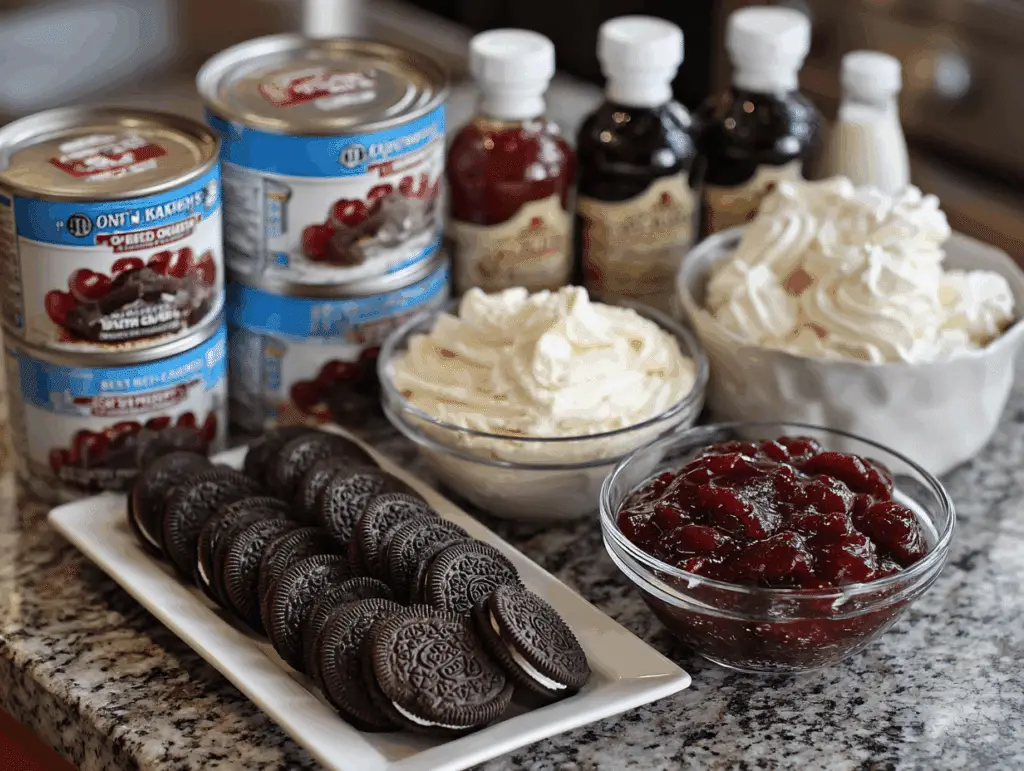
Everything You Need for This Show-Stopping Black Forest Icebox Cake
The Creamy Dream Base:
- 8-ounce package cream cheese, softened – Make sure it’s really soft or you’ll be fighting lumps
- 5 tablespoons granulated sugar – Just enough sweetness
- ½ teaspoon pure almond extract – This is the secret to that authentic Black Forest flavor!
- ¼ teaspoon pure vanilla extract – Because vanilla makes everything better
The Cherry Star:
- 42 ounces (2 cans) cherry pie filling, divided – The gorgeous centerpiece of this whole thing
The Fluffy Magic:
- 16 ounces (2 containers) whipped topping, thawed and divided – Makes everything light and airy
The Chocolate Foundation:
- 50 chocolate Oreo cookies – These become your “cake” layers
- ⅔ cup whole milk – For softening those cookies into perfection

Want to switch things up? Chocolate wafers work instead of Oreos, cherry extract can boost the fruit flavor, and you can make your own whipped cream if you’re feeling fancy.
Let’s Make This Incredible Black Forest Icebox Cake!
Step 1: Create That Perfect Cream Base
Using a mixer, beat that softened cream cheese with sugar, almond extract, and vanilla for about 1½-2 minutes until it’s completely smooth and gorgeous. Make sure your cream cheese is really at room temperature – cold cream cheese equals lumpy disaster!
Step 2: Fold in the Cherry Goodness
Gently fold 1¼ cups of that cherry pie filling into your cream cheese mixture, making sure the cherries are evenly distributed. Save the rest of the cherry filling for the grand finale on top!
Be gentle here – you want those cherry pieces to stay intact and look beautiful.
Step 3: Make It Light and Fluffy
Fold 3 cups of thawed whipped topping into your cream cheese-cherry mixture until everything’s evenly combined and looking absolutely gorgeous. The mixture should be light, fluffy, and dotted with beautiful cherry pieces.
Step 4: Start Your Layers
Spread ¼ cup of whipped topping in the bottom of a 9×9-inch dish. This prevents your cookies from sticking and makes serving so much easier later.
Step 5: The Cookie Magic Begins
Here’s where your Black Forest icebox cake really starts coming together! Dip half of those Oreos one at a time in milk (quickly – don’t let them get soggy!), then arrange them over that whipped topping base.
Work fast but don’t panic – they should be moistened but not falling apart in your hands.
Step 6: Layer Like a Pro
Using an offset spatula (or just a regular spoon if that’s what you’ve got), spread half of your cream cheese-cherry mixture evenly over those first cookies. Make sure you get to all the edges for consistent layers in every slice.
Step 7: Repeat the Magic
Dip the remaining Oreos in milk and create your second cookie layer, then spread the remaining cream cheese mixture on top. You’re basically building the most delicious edible skyscraper ever!
Step 8: The Waiting Game
Spread the remaining whipped topping evenly over everything, cover tightly, and refrigerate for at least 6 hours or overnight. This is where the real magic happens – those cookies transform into cake-like layers and all the flavors meld together beautifully.
Step 9: The Grand Finale
Right before serving (and this is important – right before!), spread that reserved cherry pie filling over the top. This creates the most gorgeous finish and gives you extra cherry flavor in every bite.

Making Your Black Forest Icebox Cake Look Restaurant-Perfect
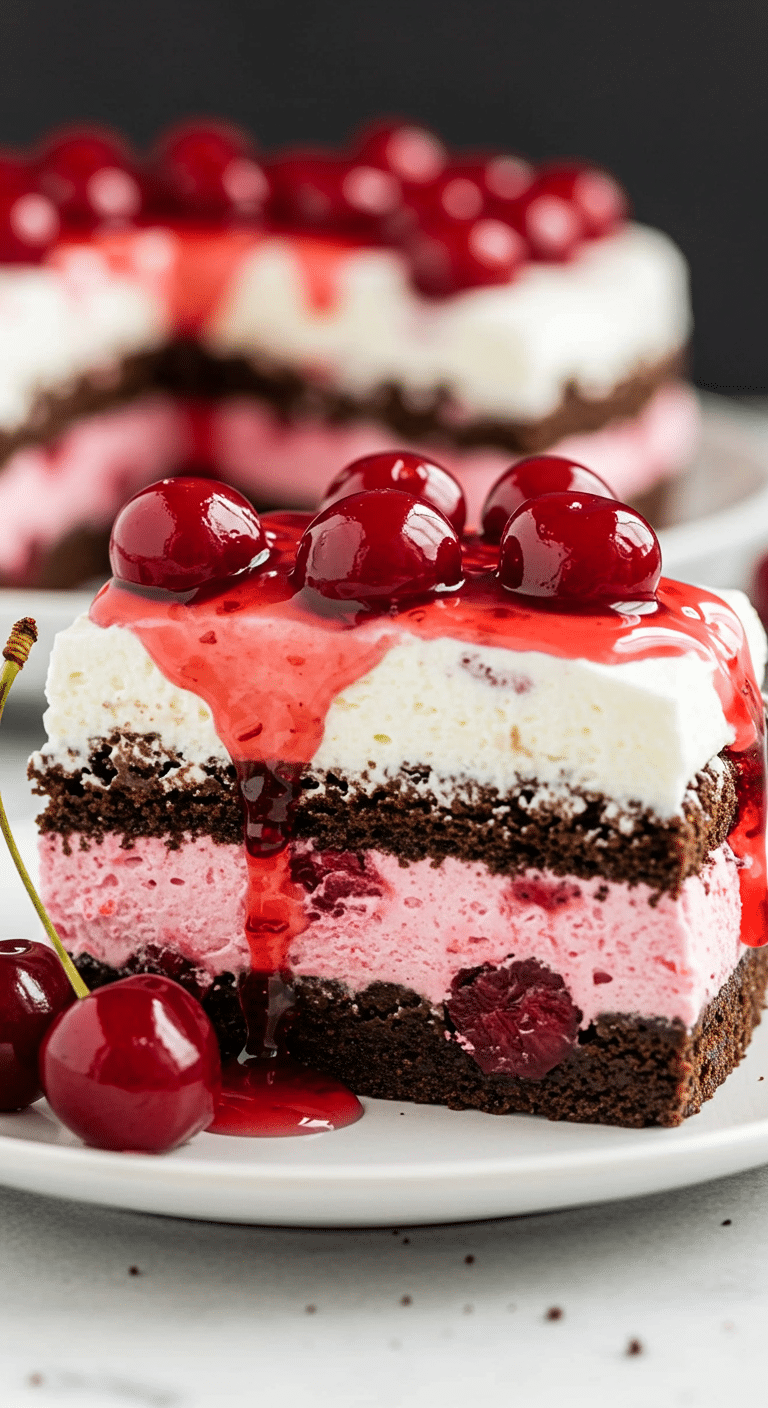
The beauty of this gorgeous Black Forest icebox cake is how stunning it looks when you cut into it – those distinct layers of chocolate, cream, and cherries are pure eye candy! Use a sharp knife dipped in warm water and wiped clean between cuts for the cleanest slices.
Serve it nice and chilled for the perfect contrast between those soft, cake-like cookie layers and that creamy filling. The cherry topping provides this beautiful pop of color that makes it look as good as it tastes.
PrintBlack Forest Icebox Cake: The No-Bake Wonder That’ll Save Your Summer (And Your Sanity)
This no-bake Black Forest Icebox Cake is a decadent layered dessert made with cherry pie filling, creamy whipped topping, chocolate Oreos, and a smooth cream cheese blend. Perfect for holidays or gatherings, it requires no oven and sets beautifully in the fridge.
- Prep Time: 20 minutes
- Cook Time: 0 minutes
- Total Time: 6 hours 20 minutes
- Yield: 12 servings
- Category: Dessert
- Method: No-Bake
- Cuisine: American
- Diet: Vegetarian
Ingredients
- 8 oz cream cheese, softened to room temperature
- 5 tablespoons granulated sugar
- ½ teaspoon pure almond extract
- ¼ teaspoon pure vanilla extract
- 42 oz (2 cans of 21 oz) cherry pie filling, divided
- 16 oz whipped topping (2 containers of 8 oz each), thawed and divided into 3 cups, ¼ cup, and remainder
- 50 chocolate Oreo cookies (family-size pack, about 20 oz)
- ⅔ cup whole milk
Instructions
- In a stand mixer or using a handheld mixer on medium-high speed, beat cream cheese, sugar, almond extract, and vanilla extract for 1½ to 2 minutes until smooth and well combined.
- Fold in 1¼ cups of the cherry pie filling.
- Fold in 3 cups of the thawed whipped topping and set aside.
- Spread ¼ cup of whipped topping on the bottom of a 9×9 inch baking dish.
- Dip half of the Oreo cookies one at a time in the milk and place them over the whipped topping layer.
- Spread half of the cream cheese and cherry mixture evenly over the Oreo layer.
- Repeat the dipped Oreo layer on top of the cream cheese mixture.
- Spread the remaining cream cheese mixture over the second Oreo layer.
- Spread the remaining whipped topping over the top and cover the dish.
- Refrigerate for at least 6 hours or overnight to set.
- Before serving, spread the remaining cherry pie filling over the top layer. Slice 4 by 3 (12 slices total) and serve.
Notes
- Ensure cream cheese is softened to room temperature for a smooth filling.
- Dip Oreos quickly in milk to prevent them from getting too soggy.
- Best served chilled; leftovers can be stored in the fridge for up to 3 days.
Storage and Make-Ahead Magic
The amazing news: This Black Forest icebox cake keeps beautifully in the fridge for up to 4 days, and honestly, it tastes even better after the first day as all those flavors meld together.
Make-ahead perfection: This is the ultimate stress-free entertaining dessert! You can make it completely up to 2 days ahead – just add that cherry topping right before serving.
Storage tip: Cover it tightly with plastic wrap to keep it fresh and prevent it from absorbing any weird fridge smells.
Want to Get Creative With Your Black Forest Icebox Cake?
Chocolate Lovers: Add mini chocolate chips to the cream cheese mixture and use chocolate whipped cream for extra chocolate intensity.
Boozy Version: Add 2 tablespoons of kirsch (cherry brandy) to the cream cheese mixture for that authentic German touch and grown-up flavors.
Fresh Berry Style: Use fresh mixed berries instead of cherry pie filling for a different fruit twist.
Mocha Twist: Add instant coffee to the cream cheese mixture for coffee notes that complement chocolate and cherry perfectly.
More No-Bake Summer Magic You’ll Go Absolutely Crazy For!
If this Black Forest icebox cake has got you totally hooked on no-bake desserts that save you from turning on the oven (and honestly, who wants to bake when it’s blazing hot outside?), you’re going to absolutely love these other incredible treats that’ll keep your summer dessert game strong and your kitchen cool.
First up, this strawberry pretzel salad is a sweet and salty slice of pure bliss that’s got that same layered magic as our icebox cake. It’s the perfect combination of crunchy, creamy, and fruity that’ll make you wonder why you ever turned on your oven in summer!
Then there’s this amazing no-bake ice cream sandwich cake that’s the ultimate summer delight for when you want something that’s basically guaranteed to make everyone happy. It’s ridiculously easy and tastes like childhood summer dreams!
And if you’re loving the Black Forest flavors but want to try a different format, this no-bake Black Forest cheesecake is a decadent dessert that’ll absolutely impress everyone. Same amazing flavors, totally different but equally stunning presentation.
Want tons more no-bake summer inspiration and cool dessert ideas? I’ve got my Pinterest packed with amazing recipes that’ll keep you out of the hot kitchen all season long!
Why This Black Forest Icebox Cake is a Total Game-Changer
Look, I’ve made my fair share of complicated desserts, but this Black Forest icebox cake is in a league of its own when it comes to the effort-to-impressiveness ratio. You get all the satisfaction and flavor of that fancy traditional cake without any of the stress or potential for disaster.
The genius of this wonderful Black Forest icebox cake is how it delivers those sophisticated, classic flavors through the simplest assembly technique ever. Those milk-softened cookies become perfect cake layers, the cream cheese provides that tangy richness, and the cherries bring all that fruity sweetness together.
Whether you’re hosting a summer barbecue, need something amazing for a potluck, or just want to treat yourself to something special without heating up the kitchen, this incredible Black Forest icebox cake delivers every single time. It’s the kind of dessert that makes people think you’re way more skilled than you actually are!
The best part about this delicious Black Forest icebox cake? It’s practically foolproof. No worrying about cakes falling, no complicated techniques, just simple assembly and patience. Sometimes the best things in life really are the simplest!
So go ahead, make this fantastic Black Forest icebox cake and prepare to become the dessert hero of every summer gathering. Trust me, once people taste this beauty, they’ll be begging you to bring it to every single event!
FAQ
How long does Black Forest icebox cake need to chill?
Black Forest icebox cake needs at least 6 hours of chilling time for optimal texture, though overnight (8-12 hours) is even better. This time allows the cookies to soften into cake-like layers while flavors meld together beautifully. The longer chilling time ensures the cookies reach the perfect tender consistency that makes icebox cakes so appealing.
Can you make Black Forest icebox cake ahead of time?
Yes, Black Forest icebox cake is perfect for make-ahead preparation and actually improves with time. You can assemble it completely up to 2 days in advance, but add the cherry pie filling topping just before serving to maintain distinct layers and prevent color bleeding. Cover tightly and refrigerate until ready to serve.
What cookies work best for icebox cake?
Chocolate sandwich cookies like Oreos work excellently for Black Forest icebox cake because they soften perfectly when dipped in milk and provide rich chocolate flavor. Chocolate wafers, chocolate graham crackers, or even chocolate chip cookies can substitute. The key is using cookies that soften well but maintain some structure when moistened.
Why do you dip cookies in milk for icebox cake?
Dipping cookies in milk softens them so they transform into cake-like layers during chilling rather than staying hard and crunchy. The milk absorption allows cookies to meld with cream layers, creating the smooth, cohesive texture that defines icebox cakes. Without this step, the cookies would remain too firm and create unpleasant texture contrast.

