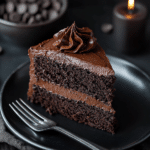
The Most Amazing Chocolate Cake: A Decadent Dream Come True
Bake The Most Amazing Chocolate Cake—rich, moist layers with luscious ganache. Easy recipe for a show-stopping chocolate lover’s delight!
Ingredients
Here’s everything I use, measured out with love:
- For the Chocolate Cake:
- 4 large eggs
- 300 grams sugar
- ½ teaspoon salt
- 1 teaspoon vanilla extract
- 400 ml. sour cream
- 125 ml. vegetable oil
- 420 grams all-purpose flour
- 140 grams cocoa powder
- 10 grams baking soda
- 375 ml. lukewarm water
- For the Chocolate Ganache:
- 400 grams of dark chocolate
- 375 ml. whipping cream
I line it all up on my counter, and it’s like a chocolate treasure trove. This makes a big, gorgeous cake—perfect for sharing or hoarding, depending on my vibe. It’s my roadmap to fudgy bliss. I always double-check my stash before I start—it’s my ritual to stay chill. Nothing’s worse than missing cocoa mid-mix, right? Keeps me in the zone and ready to bake.
Instructions
Step 1: Preheat and Prep
Let’s dive in—crank your oven to 170°C (340°F) and feel the kitchen hum with promise. Grab your cake pan—grease it well with butter or oil, because we want this beauty to slide out easy (I sneak a little extra grease just to be sure!). Take a sec to breathe—this is gonna be amazing, and you’re already on your way.
Step 2: Whip the Base
In a mixer bowl with the whipping attachment, toss in 4 large eggs, 300 grams sugar, ½ teaspoon salt, and 1 teaspoon vanilla extract—whip it on high until it’s airy, light, and a bit foamy (I love watching it fluff up like a cloud!). Keep going until it’s pale and dreamy—my arm’s buzzing with excitement already. This is the fluffy start to our chocolate heaven.
Step 3: Mix in the Creamy Goodness
Pour in 400 ml. sour cream and 125 ml. vegetable oil—switch to medium speed and mix slow until they blend right in (I sneak a peek at that creamy swirl!). Don’t rush it—let it soak up nice and smooth, because this is what keeps it moist. I’m grinning already—it’s looking so good!
Step 4: Add the Dry Stuff
Sift 420 grams all-purpose flour, 140 grams cocoa powder, and 10 grams baking soda into the bowl—go slow on medium speed until it’s almost uniform (I love that cocoa cloud poofing up!). It’ll get thick and chocolatey—don’t overmix, just let it come together. This is where the fudgy soul starts shining.
Step 5: Smooth It Out with Water
Pour in 375 ml. lukewarm water—keep mixing on medium until it’s a smooth, glossy batter (I swirl it slow and watch it turn perfect!). It might look thin, but trust me, it’s magic in the making—give it a good stir till it’s all one happy mix. Pour it into your greased pan—admire that chocolate river, because it’s ready to bake!
Step 6: Bake to Perfection
Slide the pan into the oven and bake for 50-60 minutes—peek until it’s puffed up, steady when you touch it, and a skewer comes out with moist crumbs (I get giddy watching it rise!). Pull it out when it’s just right—my kitchen smells like a chocolate dream, and I’m counting the seconds. Let it cool completely at room temp—patience here is key, and it’s worth it!
Step 7: Slice the Layers
Once it’s cool, grab a long, serrated bread knife—if the top’s domed, slice it flat (I nibble the scraps, don’t judge!), then cut the cake into two even layers. It’s like unwrapping a gift—those moist, fudgy insides make me grin every time. Set them aside—you’re halfway to glory!
Step 8: Melt the Ganache
Chop 400 grams dark chocolate and toss it in a bowl—add 375 ml. whipping cream and melt it in the microwave (30-second bursts, stirring in between) or over a double-boiler until it’s smooth and shiny (I drool watching it turn glossy!). Cool it at room temp for 4-5 hours until it’s thick like paste—or speed it up in the fridge, stirring every few minutes (I’m impatient, so I fridge it!). This ganache is gonna make your cake sing.
Step 9: Assemble the Beauty
Place one cake layer on a serving plate—pour about 1/3 of the ganache on top and spread it even with a palette knife (I swoop it smooth and feel like an artist!). Stack the second layer on top, then slather almost all the remaining ganache over the sides and top—make it sleek and gorgeous (I save a little for piping!). It’s looking like a chocolate dream already.
Step 10: Decorate and Serve
Scoop the last bit of ganache into a piping bag with a 1 cm serrated tip—pipe swirls or dollops on top (I go wild and make it pretty!). Let it sit at room temp—slice it up and serve; that first bite’s gonna melt your heart, I swear. Pair it with coffee or just dig in—it’s pure chocolate joy, and you made it happen!
